In an effort to reduce waste this Christmas I began seeking out gift wrap alternatives. Nothing was exactly what I was looking for (beautiful, tailored, and looked like gift wrap) so I spent the year (yes YEAR) coming up with my own fabric gift wrap tutorial. What makes this one special is that it fits right in with your wrapping paper and most people won’t ever know the difference!

Some of my fondest childhood memories are of my large, extended family having Christmas’s together. There was laughter, hugs, and people everywhere. My grandma was a wonderful decorator and Christmas was a time when it always shined. Now, this may seem materialistic, but one thing I always remember were her gifts. When grandma handed you a gift it was special. I remember some of the toys and items she gave me, I’m looking at a paperweight from one Christmas as I type, but one thing that I remember from every year was her wrapping. She was the only person I ever knew whose gift wrap was as exciting as what was inside. (I may have been a weird kid.) The paper always seemed more special (even tho I know it wasn’t), the bows were these big fluffy, ribbons like the kind you would see on display at a department store, and sometimes there would be ornaments attached to the outside. In short the packages were beautiful.
As an adult I’ve learned how to make the big Christmas bows and I’ve got a pretty strong gift wrap game going on. Each time I wrap a gift I think about my Grandma Sam and those Christmas’s. But last year as I was searching for plain white gift wrap (a go-to of mine for my upstairs tree) I began to think about how much gift wrap is used each holiday and wondered if there was a way I could use fabric to make reusable gift wrap.
A simple search on Pinterest brings up many pins about Furoshiki – Japanese fabric gift wrap. After looking into it a little more I knew that even tho this is beautiful in it’s simplicity, unless I wanted to be the only one wrapping any gifts in my house that this wasn’t what I was looking for. We do use gift bags, and I found plenty of sewing tutorials for gift bags, but I love the look of a wrapped box and I wasn’t ready to give up the idea of beautifully wrapped boxed with big fluffy bows just yet.
But if you are looking to make your own gift bags here are some great tutorials:
- Skip to My Lou: Drawstring Gift Bags
- Alanda Craft: Quick & Easy Drawstring Gift Bag Tutorial
- Peek A Boo Pages: Fabric Gift Bags Free Pattern & Tutorial
In full disclosure I began this project at the beginning of the year. I haven’t been working on it non-stop all year but as I am not an expert seamstress, nor is sewing my only hobby, it’s taken me a little bit of time here and there to get this project to the point where I can share it with you. Now that I’ve got it worked out I can easily make one in about 30 minutes.
For this project you will need:
- Fabric of your choice, prewashed
- Sewing Machine
- Thread
- Hook & Loop
- Fabric Glue
- Pins
- Pinking Shears
- Scissors Binder Clips
- 11″ x 17″ Gift Boxes
Because I like the look of wrapped boxes I always try and keep a stash of gift boxes on hand. I try and reuse the boxes year to year but of course when you give a gift you are giving the entire gift, so sometimes people like to keep the box their gift comes in. When Christmas items get marked down to 70-90% off there are normally still loads of gift boxes left so that’s when I stock up for the following year. Luckily gift boxes come in standard sizes and this pattern will fit boxes that are 11″ x 17″.
Before we get into the full fabric gift wrap tutorial go ahead and wash, dry and iron your fabric. You will need a piece of fabric that is 27″ x 25″, the top of your fabric should be cut using pinking shears. Because I am not an expert seamstress I may do some things here that are a ‘no-no’. This has worked for me but by all means take this and improve upon it! I don’t have a rotary cutter or cutting mat so I did all of my cuts with sharp scissors and pinking shears. Someone out there is going to absolutely crush this project in ways I don’t have skill or patience to execute. If that person is you PLEASE send me pictures of your finished project!
Go ahead and lay your fabric out on your flat surface. Along the top you need to make 4 cuts using your pinking sheers. Each cut needs to be 6.5″ deep. Make your cuts at 1.5″, 12″, 14″ and 26″ inches.


To begin we will do some work to the top flaps of fabric. You will have two sides that are longer and two skinny end flaps. Lay your fabric flat and using one of the long top flaps fold the sides into each other to make point, pin and sew. Once your flap has been turned into a point fold the point of the flap back to create a straight edge, pin and sew.


Now that the cuts have been made fold your fabric in half with the right sides in. Pin your sides together and make a straight stitch.

Take your sewn ‘tube’ and lay it out flat with the sewn side centered facing up. Pin the bottom of your tube together and sew with another straight stitch.

Now that you have created a bag of sorts we will square off the bottoms. Take the corner of your bag and fold it so the bottom creates a little triangle and the bottom stitch you just made is centered on the top of your triangle. Measure about an inch in and make a straight stitch. You can also dry fit your box and pin where the excess is. At first I did this and then eventually I just began loping off corners here and there. Both seem to have the desired effect so you do you. 😉 Take your pinking shears and trim off the excess corner that you just sewed.


Now fold your bag right side up so the outside of your gift wrap is facing up. Go ahead and dry fit your gift wrap on your box. Are you beginning to see it come together? I am going to go ahead and give you the measurements of where to place your hook and loop BUT before you sew you may want to give it a dry run on your box to make sure the folds will be tight enough for you. My goal was to make fabric gift wrap that was as tailored as paper so I didn’t want the fabric to be floppy. I found that depending on the type of fabric you use (and how much stretch it has) does affect these measurements some. The fabric I am picturing here has quite a bit of stretch, which I came to prefer during my trial and error.
Now it’s time to attach the hook and loop and finish this fabric gift wrap! I am going to try and explain the next part the best I can. I tried to take as many photos as I could along the way because I knew that I may not have the right words to describe what I’m doing. I also want to mention that my first attempts at this project I tried using fabric glue and it was a massive failure, so although it may feel tedious sewing the hook and loop, it is definitely the best way.
For the first piece of hook and loop sew it directly on the edge of the long top flap that we sewed into a point. Measure the length of your straight edge and cut two pieces of attaching hook and loop to that length. The one in my photo is 2.5 inches.


Once that piece has been sewn on lay your bag back out with the long flap that has not been sewn facing towards you. From the top center measure down 8.5″ and pin the coordinating hook and loop horizontally there. At this point go ahead and dry fit your gift bag to the box to confirm the placement. To measure your gift bag for a tailored fit you will slid the bag over the box and then tuck the long straight top flap onto the top of the box. Pull the pointed top flap over, tightly, and make sure that the hook and loop are in the correct position. If not go ahead and repin the one on the back before sewing.

Ok, guys – we are REALLY close to being done, just two more pieces of hook and loop to attach! We’ve pretty much ignored the two skinny side flaps that we cut at the very beginning but it’s time for us to turn our attention to them. Cut two pieces of hook and loop to 1.5″. Near the top edge of the right side of the fabric on one of those skinny side flaps pin and sew a piece of 1.5″ hook and loop. On the other skinny flap near the top edge of the fabric sew the coordinating piece of hook and loop to the wrong side of the fabric. You can dry fit this, but in all the bags I made I didn’t have to worry too much about this piece of it.

Now let’s wrap it up! To wrap your box slid the bag over the box and then attach the two skinny side pieces together. Then tuck the long straight top flap onto the top of the box under the pointed flap. Lastly pull tightly on the pointed top flap and attach the hook and loop at the end of the flap to the piece on the back of the package. Congratulations – you’ve got yourself a custom fitted fabric gift wrap bag!


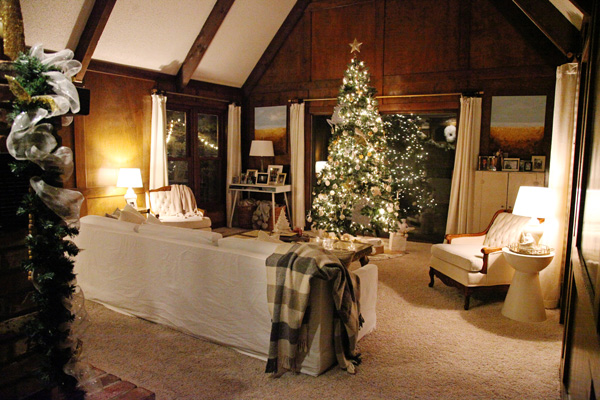
Here are a few images of a package I wrapped with a custom fabric cover. For whatever reason I used a different one than the one I showed above, but the gift with the fabric wrapping paper has the gray pom pom on top. I am showing the box under the tree intermixed with the other gifts so you can see how, depending on your choice of fabric, it seamlessly mixes in with your normal wrapping paper. I don’t plan to do all of my gifts with these this year, but over time I will continue to use them more (and thus cut down on my wrapping paper use and expense).


If you made it to the bottom of this you’re a saint. I am not kidding when I say I have been working on this project all year. Literally ALL YEAR. So the satisfaction I have today in sharing it is crazy (and a little bit like a weight because I’ve been working on this for so long). I tried my best to explain how and what to do to make your own but in case I wasn’t clear I also mocked up this, not to scale, reference to hopefully help clarify anything that I didn’t address above.

I think this is going to be my last Christmas DIY for the season (at least my husband is hoping so – ha!), but if you’re looking for more ways to craft your way to Christmas be sure to check out these (I promise they are easier and take way less time!):
- DIY Mirror Ornaments
- Easy Holiday Card DIY Display Idea
And if you do this fabric gift wrap project PLEASE send me pictures and let me know! Post yours on Instagram and tag me! instagram.com/grandlittleplace
Don’t forget to pin!


Leave a Reply