Now that the holidays are over and we don’t have any ‘big’ holidays for a while why would we set a tablescape in January of all months? Isn’t this supposed to be the ‘off” month after all of our holiday hard work? No way! Now is the time to practice our skills so that our tables can S-H-I-N-E the next time we want to host a big get together! The best news is that we are going to walk through this together and at the end you’ll have learned new, easy to implement ways to up YOUR table game! To catch up on this years challenge and WHY you would want to do a tablescape check out my last post!

Now, let’s set our January table!
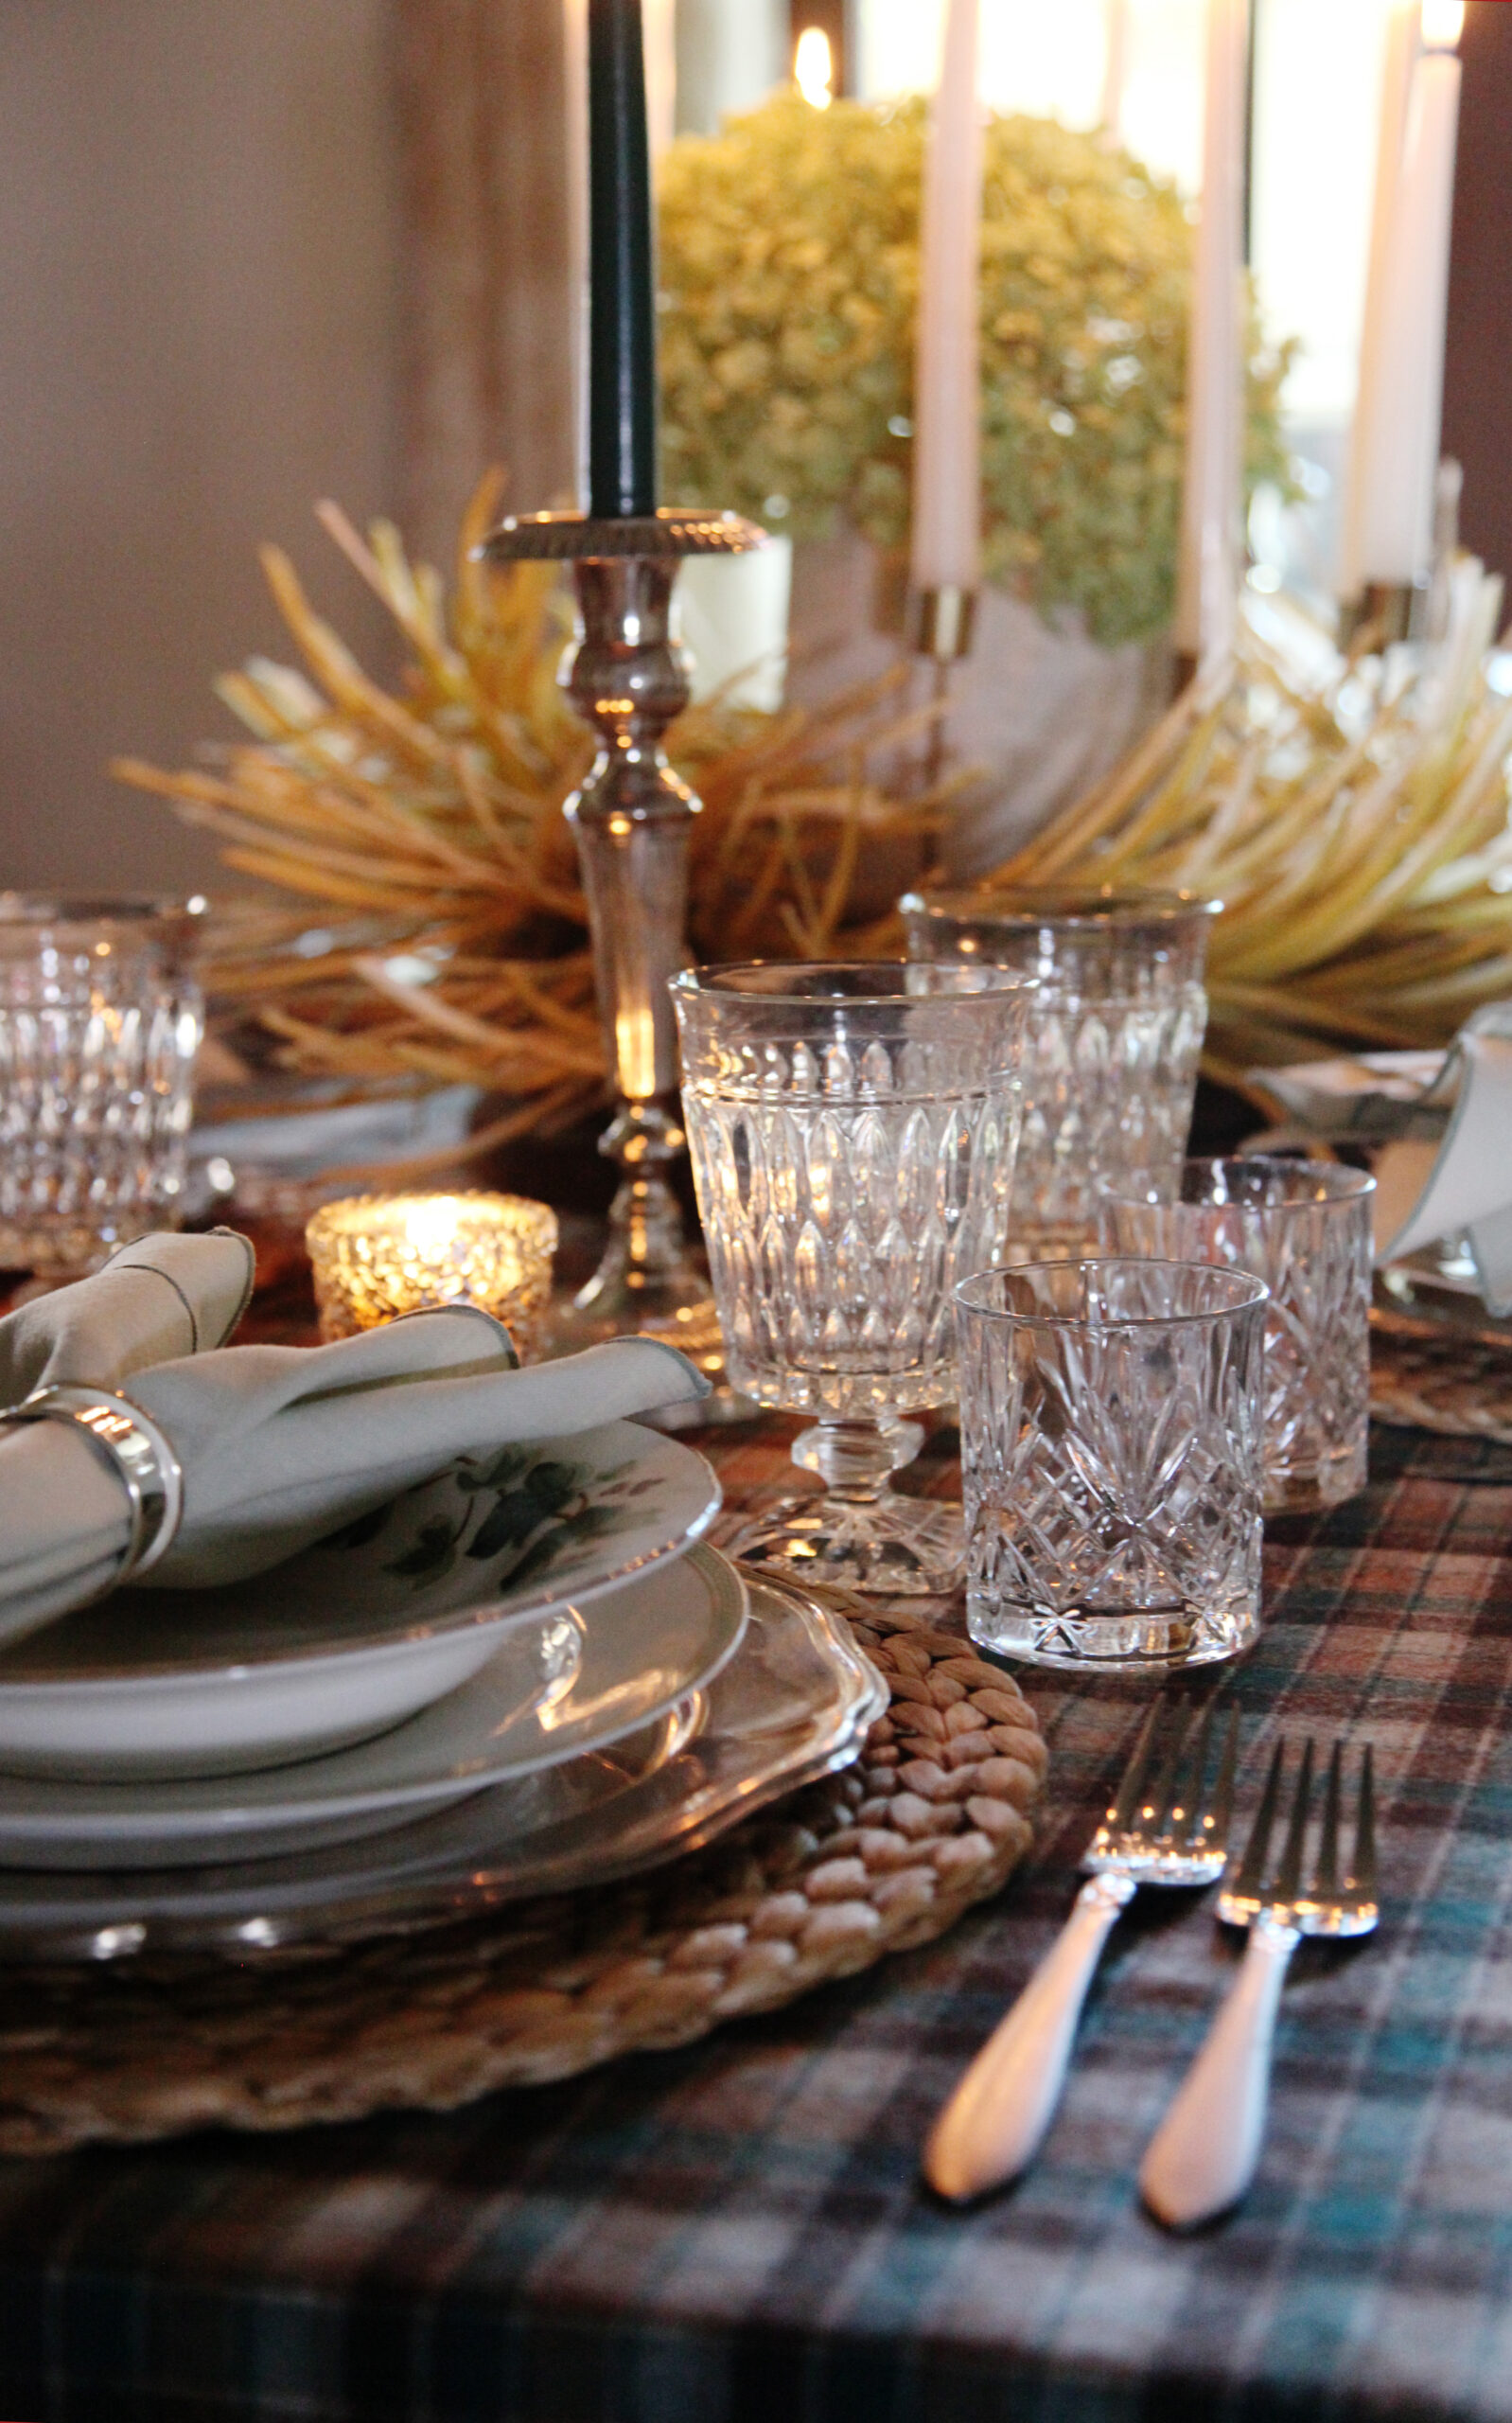
We all just pulled our Christmas decor down, traveled everywhere and spent all of our money – we’re tired! So this month we are going to keep our table calm and relaxing. That means we are going to work with a limited, neutral color palette and make it interesting by focusing on our TEXTURE, NATURE and LIGHTING. You will need to pull items to really layer up the table. Pull linens, placemats, chargers, dishware (as many layers as you want), glassware, flatware and any item you think would work for a centerpiece.

How to set a neutral tablescape:
- First step – choose your base table linen. The last several years I’ve begun layering my tables not with traditional table clothes but with blankets and throws. It started as an answer to my particular table. I wasn’t happy with the lap length against the ottomans at my table and it just felt like a giant rectangle had been plopped down. I have a large table and the tablecloth seemed to draw attention to how massive it is, NO THANK YOU MA’AM. At the same time I was craving intangibly MORE & DIFFERENT. Enter the blanket, aka tablescape MAGIC. Blankets come in every color, pattern and texture – YUM – and you don’t have to worry about the sizing as much as you do on traditional table linens. Win, win in my book! To get started grab your blanket and toss it across the table. This is known as a ‘table throw’. It will not cover the entire table, that’s ok. Lay the blanket diagonally across the table so opposite corners are hanging off alternating edges. It gives wonderful movement to the table, mixes up the basic rectangle or oval table shape and sets the base with a big dose of yummy texture.
- Second step – placemats. I recommend round placemats over rectangle. This has a practical purpose but in the end looks better too. I find that when the table is full and I set with rectangle placemats it completely covers the table linen and looks like big long runners all around the perimeter of the table. Bleh. Design wise the addition of circles to the table helps break up all of the angles on my rectangle dining table and allows for a better ‘flow’ with the rest of the items I add. The last, and most practical argument for round placemats is this: I find that the round placemats wash and wear much better than their rectangle counterparts. The placemats I find myself reaching for time and time again are these simple banana leaf placemats. I have had these for 6+ years and they are still in excellent condition despite being used on repeat. They have had many food accidents that I scrub away with my dish brush and water. When these go out I will 100% replace with a new set, they are the bread and butter of almost all of my tablescapes.
- Third step – chargers. I always layer a charger with the placemat. The main reason is that it looks soooooooo pretty. 🙂 The second reason is that it helps keep food off of the placemats! (Which of course are keeping food off the tablecloth-HA!) When I was first beginning my table journey I made it a mission to have chargers in every color: silver, gold, red, orange, brown, and black. You can easily find sets of these chargers around the holidays, even the Dollar Tree carries them now in various colors and patterns. Then something kind of funny happened. Within a year EVERY.SINGLE.ONE of the chargers got brittle, cracked and broke. I am not exaggerating. They all seemed to have a very specific life span of around 9 years, which was pretty weird. After that I decided I wanted metal chargers. I didn’t actually know if that was a thing I could find or not but luckily I happened to find the most darling sterling silver chargers for $1 each at a local thrift store shortly after that. (In a set of 12!) I have given up on all other chargers and use these exclusively.
- Fourth step – plates and dishware! Now is the time to REALLY have some fun! Dig out your dishes! If you have ‘fancy’ china pull it out (who is it waiting for anyway?). For this setting I stuck with white and greys but mixed the patterns a bit. If I didn’t have the china plates I could have easily used my plain white everyday plates in it’s place. For a bit of interest I decided to break up my normal grey and white floral set. I set 4 place settings with the grey floral dinner plates and then layered them with a magnolia floral bread plate. For the heads of the table I alternated and used grey solid banded dinner plates with the grey floral salad plates. There are no fixed rules here – play around until you get combinations that YOU like.
- Fifth step: Glassware! This is a part of the table that is totally EXTRA and it’s fabulous. Fill in your table with as much glassware as you dare. I typically will set with 2 glasses minimum but really like to add 3 when possible. Since this month was calmer and the centerpiece wasn’t as full I went ahead and did 3 glasses. I amped up the texture by mixing the glasses so they would have different shapes, materials and cuts. (Bonus tip: If setting a kids table, let them use champagne coupes and low ball glasses. Both are sturdy and short enough for little hands to easily manage but will still feel fancy and give them early training on how to hold fancy glassware.)
- Sixth Step: Centerpiece! Now that you’ve got your ‘base’ in on the table you will have a natural opening for your centerpiece to fit. For this table I had a diagonal opening that was perpendicular to how the blanket was laid across the table. It was the ideal size for a silver tray I had pulled out, so I put the tray in that spot. Knowing I needed to add a natural element to the table I pulled 1 (live) house plant, a Christmas cactus, 1 dried floral arrangement, hydrangeas, and a rock. Yep I said a rock! The 3 items combined to create a texture-ful centerpiece that is full of visual interest and works fabulously together. The hydrangeas are in a cut crystal vase which is tossing around the light (and creates cohesion to the crystal low ball glasses and the cut water goblets at the head spots).
- Seventh Step: Napkins! Because I am always seeking to add texture and movement to my table I often will use napkin rings with my cloth napkins. I have done many different folds over the years but there is something simple yet stunning about just pulling the napkin through the ring and having that big pop of ‘fluff’ on top of the plate. On the practical side napkins in rings are the easiest for most people to navigate while sitting at the table, whereas if they are presented with an elaborate fold they may be intimidated by how to actually use the napkin.
- Eighth Step: Flatware! Though you can get creative with how to display your flatware I typically don’t go too far off of tradition here. For this setting I kept it fairly straight forward but laid a butter spreader across the bread plate on the top of each place setting. That’s not traditional but it provided a bit of interest to this setting. If you are unfamiliar with how to set flatware this diagram by Martha Stewart is a great resource.
- Ninth (and final) step: LIGHTING! When it comes to tablescapes don’t try and recreate the wheel, your light source on a dining table are candles. I often will mix tapers with tealights but for this month I stuck with white tapers for a classic, elegant and layered look.
Now stand back and ENJOY your work!
Next month we will work to transition out of the neutral palette and layer in reds and pinks for Valentines day. If you aren’t following on Instagram make sure to join over there so you don’t miss out on the next Instagram live tablescape workshop!
BONUS! I’m adding a January Tablescape CHECKLIST to the follower FREEBIE library! Grab your checklist today by subscribing to the email list!
Don’t forget to pin!


Leave a Reply